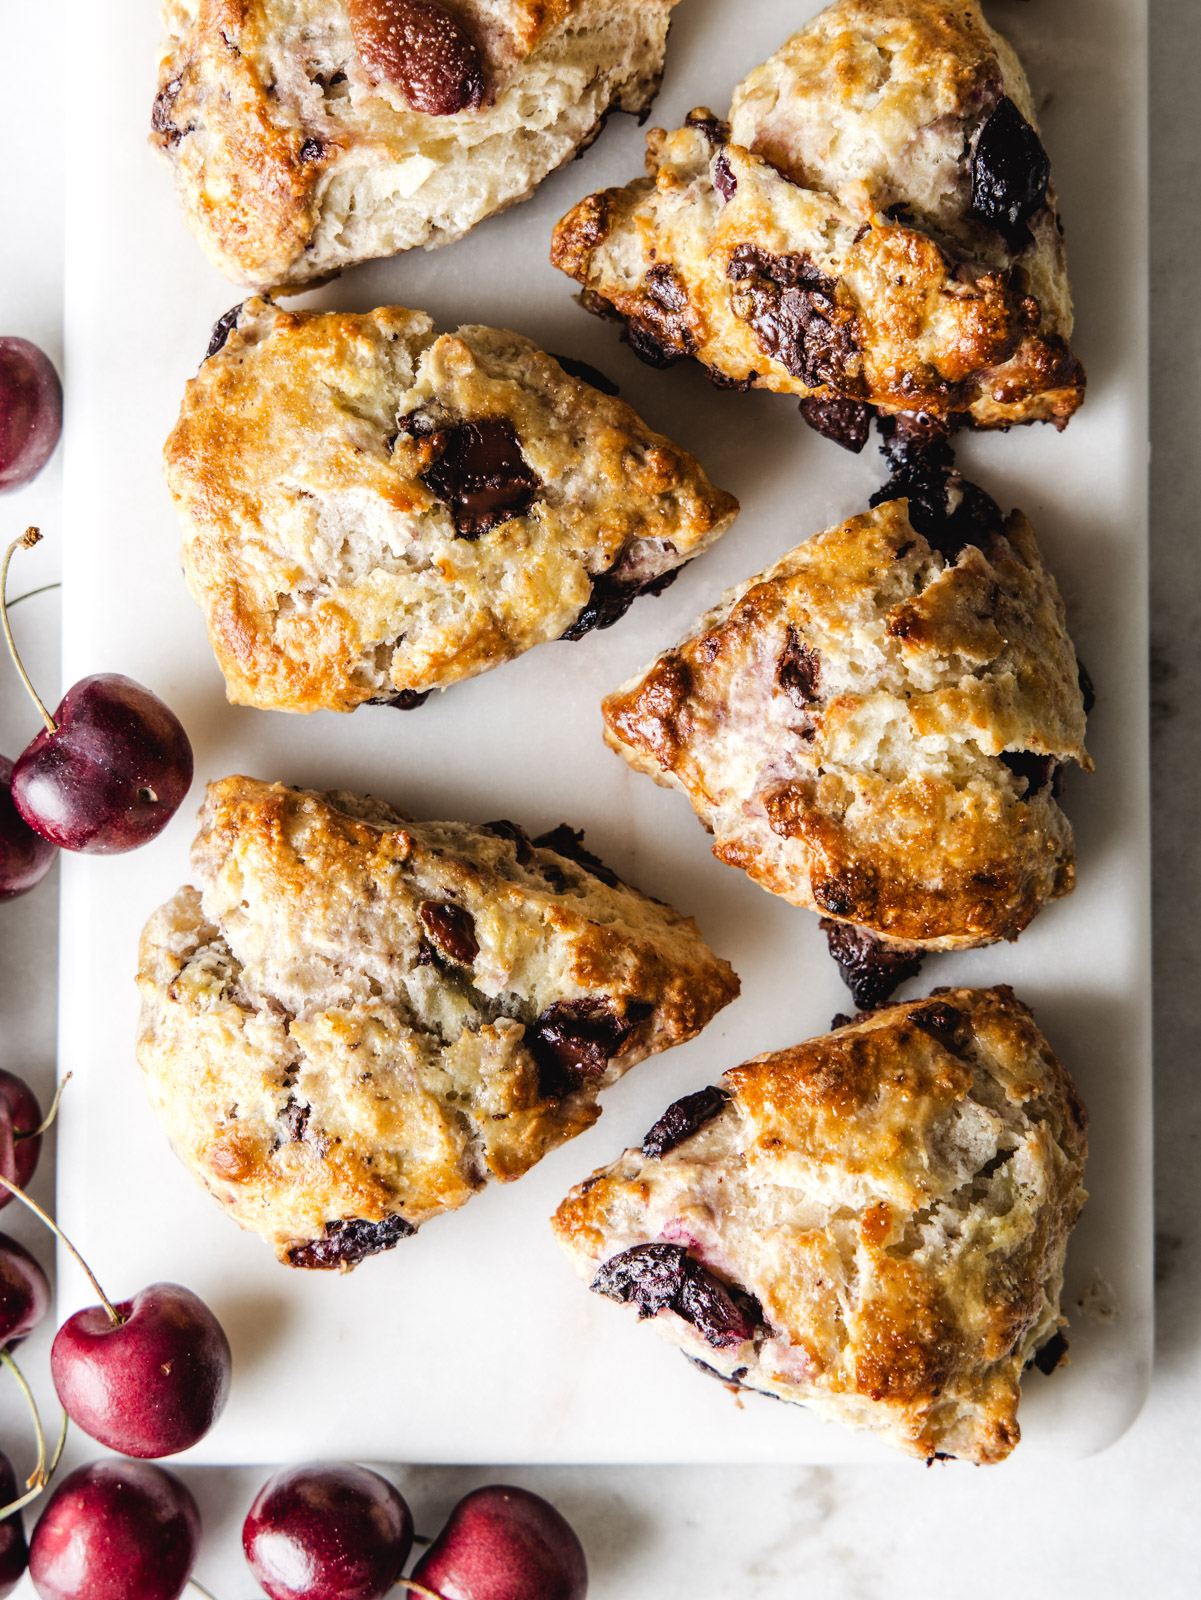
Together, we will talk through all the steps to create this laminated Basic Danish Dough recipe that can be turned into an endless amount of brunch pastries.

Danishes are croissants hipster cousin. Both were created to make all of our brunching dreams come true, but danishes can be a variety of shapes and have lot of different fillings. Both are also made out of laminated dough, which means we will make a dough with layers of butter that will give us a buttery, flaky pastry.
Laminated Dough
Let’s first talk about what laminated dough is. Laminated dough is a dough that has an enclosed layer of cold butter. The dough is then rolled out, and folded over and over again, so the final dough has lot of layers of dough-butter-dough-butter throughout.
Once the cold butter hits the oven, it will steam up and create little puffs of airs. Those puffs of air create lots of flaky layers of pastry. If you have ever worked with packaged puff pastry, you have worked with a laminated dough!
Our basic danish dough is not only a laminated dough, but it’s also an enriched dough. This means the dough recipe has more than just flour and water, it includes things like milk, butter and eggs to give a deeper and more flavorful pastry. It’s also a yeasted dough which means it has a slight bread like consistency.
Making Basic Danish Dough
To begin, we need to make the dough and let it rise. First, scald your milk ever so slightly before allow it to cool to a warm temperature, about 85° – 105°F. This is the happiest temperature to wake up your yeast. While your milk is cooling, measure out the rest of your ingredients.
Place all of your dry ingredients in a large bowl, being careful to not place the salt on top of the yeast. Salt will kill your yeast, so keep those two kids on the opposite side of the pool.
Once your milk is cooled, add your remaining wet ingredients to the bowl. Stir to bring the dough together. Turn out onto a floured counter or board and knead until the dough is smooth and springy. Place the ball of dough back into the bowl and let chill.
We’re letting this dough rising slowly in the fridge, which might be unusual if you are used to working with bread dough. This helps to create a deeper and richer flavor of pastry in the end.
Creating the Lamination
Now it’s time to bust out your crafting skills because we need to create that dough with lots of layers and butter. In order to do that, we’re going to fold our dough over and over. If you butter is cold, it will stay in nice distinct layers and bake into flaky layers.
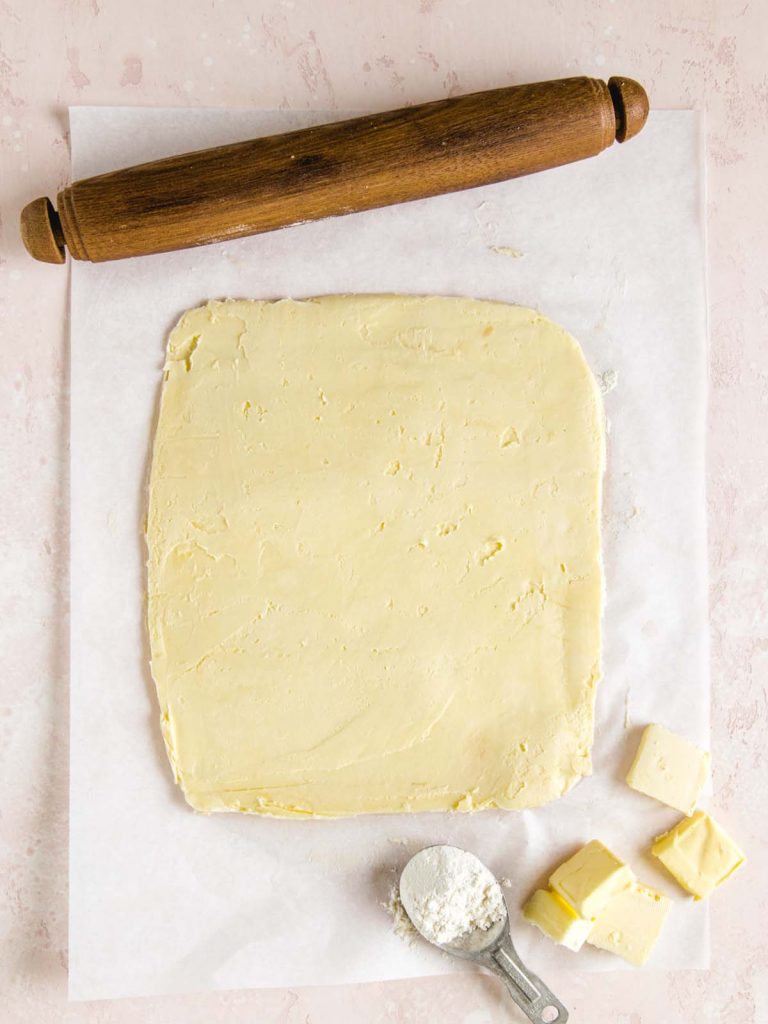
While you dough is rising in the fridge, create your butter block or beurrage. First, make sure no one in the house in sleeping. Then, place your cold butter between two sheets of parchment paper, take a heavy rolling pin and bash the daylights out of it.
Really enjoy this step because rarely do you get to beat up any thing in the kitchen. Once, your butter is flat, sprinkle the flour on top and fold it into itself to keep the flour in place and you bash your butter again. Repeat this a few times until the flour is well incorporated and the butter is very malleable. The flour is going to help keep that butter block malleable while chilled.
Finally, roll your butter out into an 8″x8″ square. I like to use a bench scraper to help make neat and straight edges.
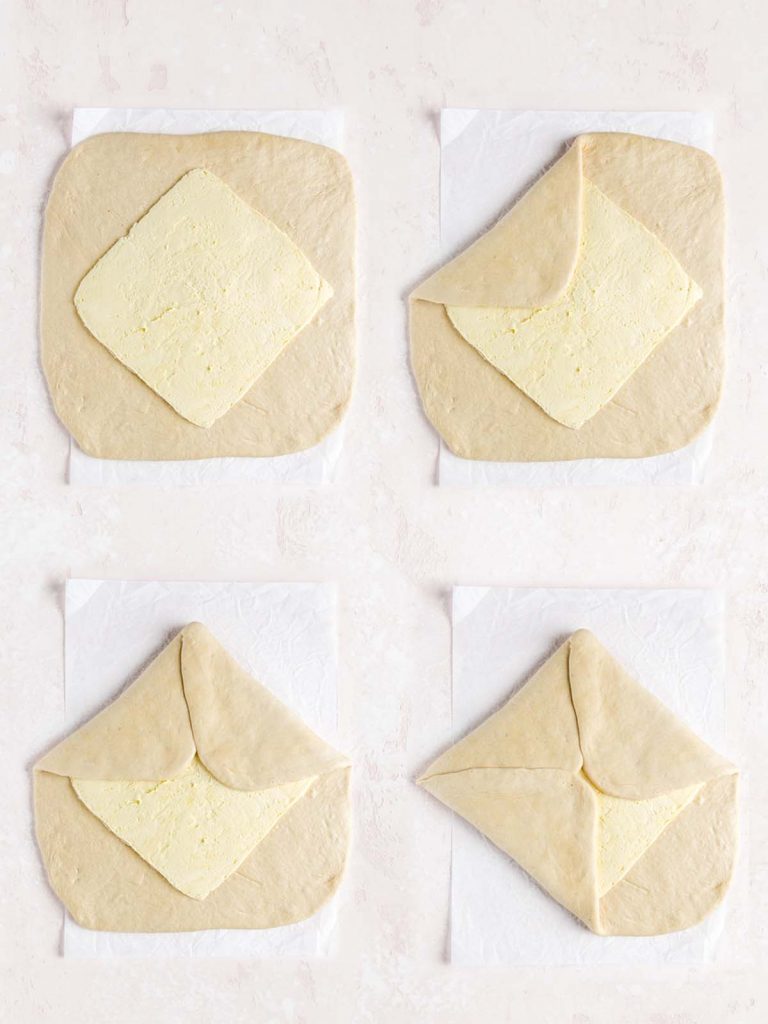
Now that your dough has risen and your butter block is ready, time to begin the rolling and folding part. Roll the dough out into a 14″x14″ square, placing your butter on top at a 45° angle. Fold each corner of the dough into the center, fully enclosing the butter. Pinch the dough together to really seal it.
Roll the dough back out into a 12″x16″ rectangle, with the 12″ side closest to you. The straighter the edges and sharper the corners the better to keep your dough from wandering too much by the end of this. A trick I picked up from a teacher: use a heavy straight pin to roll into the shape you want, but a small tapered pin to create the squared corners.
Rolling and Folding
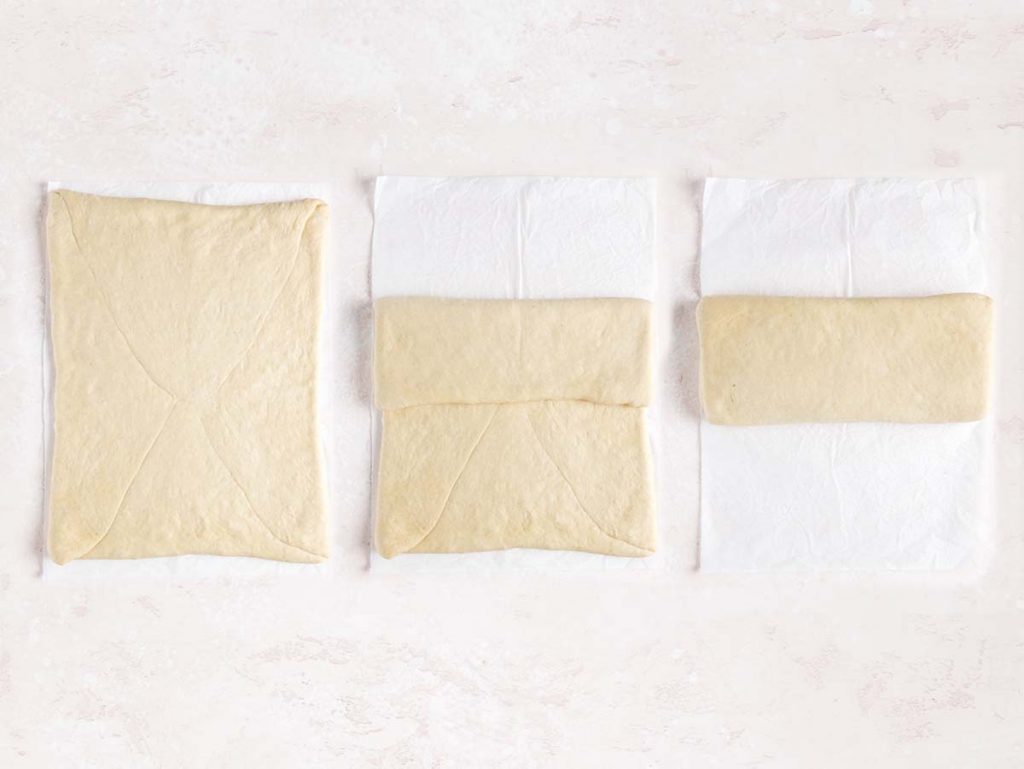
Stay calm now, we’re going to start the folding. Take the top 1/3 of the rectangle and fold in down. Take the bottom 1/3 of the rectangle and fold it up. Now you have a shape exactly like a letter folded into an envelope, right? Perfect!
Give your dough a quick roll, a few swipes to help it stick together, wrap it in plastic and toss it in the fridge for 10-15 minutes to let the butter chill again.
Remove the dough from the fridge and turn it 90° from the way it was facing you before. You should have a tall skinny rectangle with the short edge facing you. Roll out the dough again into a 12″x16″ rectangle. Repeat the letter fold like above, wrap and chill again. Repeat the process once more, so you will have done a total of 3 letter folds.
Remove the dough, turn 90° and repeat the book fold steps once more. That’s it! You’ve laminated your dough! Wrap it once more and let is chill for at least 30 minutes, but overnight is best.
Remove the dough from the fridge and let sit for about 10 minutes at room temperature before rolling. It’s best to cut it in half and let the second half stay in the fridge while you roll and shape your final dough.
What to do with Basic Danish Dough
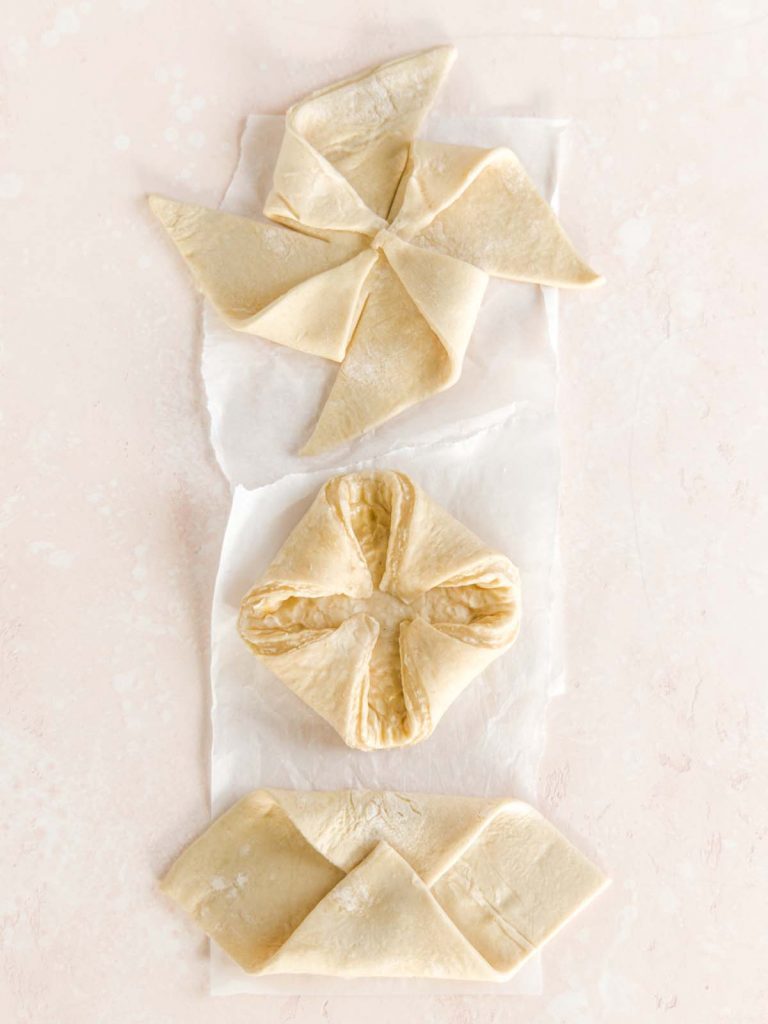
Now that your dough is ready, you can take the dough in a number of directions and shapes. Most individual danish shapes start with a 4″x4″ square and are cut and folded like shown.
A few filling options? See below! Just make sure you let your pastries rise on the counter one again, covered loosely with plastic wrap for 1 1/2 – 2 hours until puffy. Egg wash and bake at 415° for 20 minutes.
- Cream cheese and fruit, like this cranberry cream cheese danish
- Jam
- Nutella
- Almond paste filling
- Pastry cream
Tips and Tricks for Laminated Dough
- If you notice your butter breaking up into pieces as you roll it, your butter might be a little too cold. Chill it less the before you next fold. Don’t give up on it, you will still end up with flaky layers in the end!
- This is a soft, yeasted dough, which means it has a mind of its own. Let go of perfection. It will move and rise how it wants. It does not care about you and how perfectly you rolled and shaped it. You don’t need a toxic relationship with danish pastry, embrace of art of perfectly imperfect.
- The less flour you use the better the final outcome will be. This is a rule for all breads. You always want you work bench to have a verrrrryyyy light coating of flour, never heaping mounds of flour.
- If your hands get covered with lots of sticky dough as you begin kneading, place a pinch of flour in your palms and rub. Cleans it right away.
Helpful Tools for Basic Danish Dough
- A straight, heavy rolling pin, like this one.
- A small tapered rolling pin, like this one, for sharp corners
- A bench scraper for moving dough around and sharp butter blocks
Basic Danish Dough
Ingredients
Dough
- 1 cup whole milk
- 480 g bread flour + more for dusting
- 50 g brown sugar packed
- 7 g instant yeast 1 packet
- 1 teaspoon salt
- ½ teaspoon cinnamon
- ¼ teaspoon grated nutmeg
- 2 large eggs
- 2 tablespoons unsalted butter softened
- 2 teaspoons vanilla
- Egg Wash 1 egg + 1 tbsp water
Butter Block
- 285 g unsalted butter cold
- 2 tablespoons bread flour
Instructions
- Making the Dough:Scald milk in a small saucepan over low heat. Set aside to cool to 85°-105°F while measuring remaining ingredients.1 cup whole milk
- In a large bowl, combine flour, brown sugar, yeast, salt, cinnamon and nutmeg.480 g bread flour + more for dusting, 7 g instant yeast, 1 teaspoon salt, 1/2 teaspoon cinnamon, 1/4 teaspoon grated nutmeg, 50 g brown sugar
- Add warmed milk, eggs, butter and vanilla.2 tablespoons unsalted butter, 2 teaspoons vanilla, 2 large eggs
- Stir together with a wooden spoon until dough comes together.
- Tip onto a floured board, and knead until dough is smooth and springs back when touched, about 10 minutes. Bring dough into a ball.
- Lightly grease bowl, add dough back, turning once to coat, cover with plastic wrap and chill for 2 hours.
- Making the Butter Block:While dough is chilling, prepare butter layer.
- Place butter between two sheets of parchment paper. Using a heavy rolling pin, bash butter into a flat layer. Sprinkle with flour, fold butter over to enclose, and bash again.285 g unsalted butter, 2 tablespoons bread flour
- Continue folding butter over and bashing, until butter becomes malleable and flour is fully incorporated.
- Roll butter into an 8″x8″ square, using edge of rolling pin or bench scraper to achieve straight sides.
- Keep butter covered and place in fridge until dough is ready.
- Laminating the Dough:After two hours, remove dough and butter from fridge, allow to rest at room temperature for 10 minutes.
- On a lightly floured surface, roll dough to a 14″x14″ square.
- Place butter on dough at a 45° angle. Fold corners of dough over butter to fully enclose.
- Roll into a 12″x16″ rectangle, with the short edge closest to you. Fold the top 1/3 down, and the bottom 1/3 up, like a letter, brushing any flour off before folding. Gently roll to seal, wrap in plastic wrap and chill for 20 minutes.
- Unwrap dough, with the short edge closest to you, roll again to a 12″x16″ rectangle. Repeat the above letter style fold.
- Wrap and chill for 20 minutes, before repeating the above letter style fold, turning 90° before rolling.
- Wrap and chill again for at least 30 minute or up to overnight.
- Roll out to 1/4″ thickness and cut in shape desired.
- Lay danishes out on sheet pan with parchment, leaving 2″ between. Cover lightly with plastic and allow to proof at room temperature for 1-2 hours, until dough is soft and puffy.
- Brush with egg wash before baking at 415°F for approximately 20 minutes, until golden brown and cooked through.Egg Wash
Notes
- Laminated dough can be wrapped tightly in plastic wrap and frozen until ready for use.
Disclaimer: We test all recipes using the metric weights shown, we cannot guarantee outcomes when switching to US measurements.


