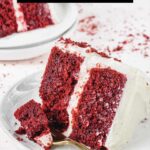
With a silky cream cheese icing and a petite bake size, this classic subtly-chocolate Southern Red Velvet Cake is a no-brainer for all cake lovers.
Red velvet cake is one of those quintessential desserts found in the South. If you ever saw Steel Magnolias, you definitely remember the armadillo-shaped grooms cake.
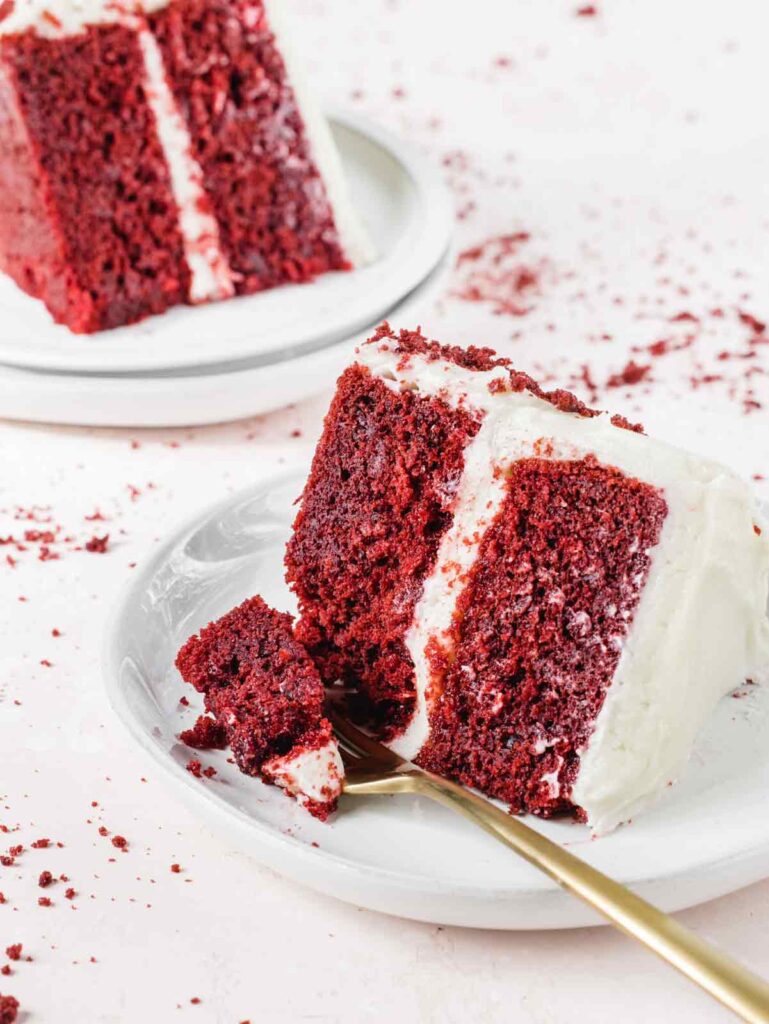
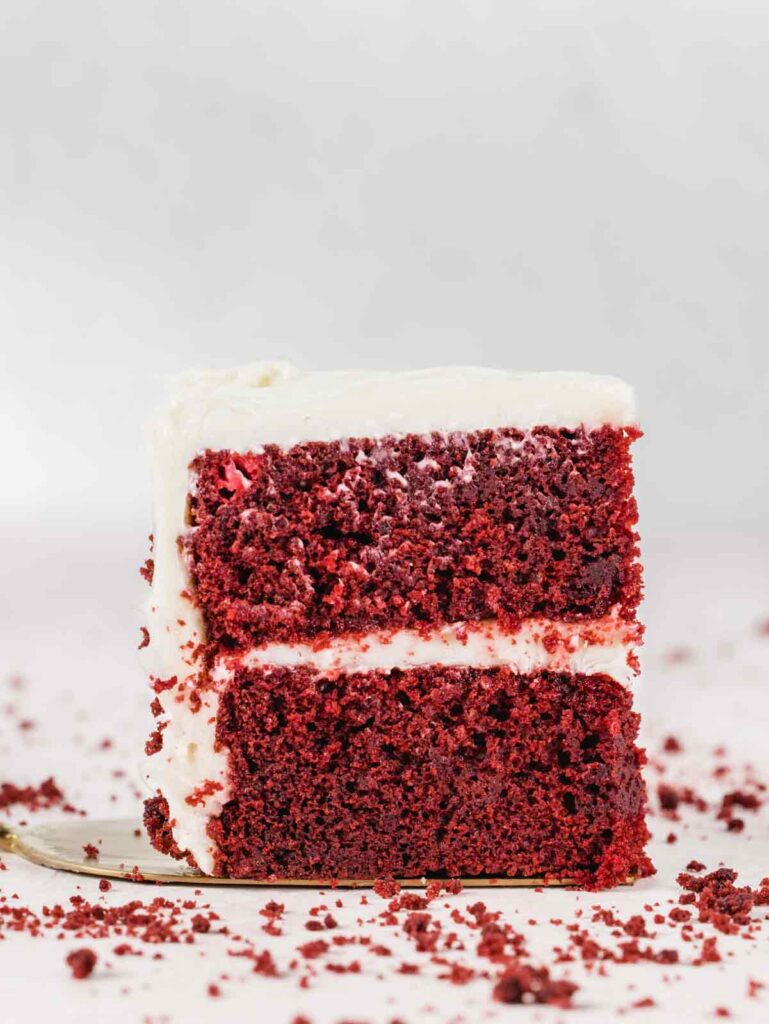
Red velvet is just slightly chocolatey and slightly tangy and a lot rich. A bit of extra tang comes from the ultra-creamy cream cheese frosting piled high. For shortcut red velvet option, you can give these Red Velvet Shortbread Cookies a try too!
Red Velvet vs. Chocolate Cake
There’s a misconception that red velvet is chocolate cake dyed red. But that’s not really the case, velvet cakes, specifically red velvet cakes, are a category all their own. Velvet cakes are known for their, you guessed, velvety texture. A fine, light, and fluffy crumb is the key.
The red velvet cake spun out of the “mahogany” cake that used cocoa powder instead of chocolate during the Victorian era. Once these cakes made their way to the South, buttermilk got involved which really amped up the acidity levels. This created a reaction with the cocoa powders of the time to create the characteristic red hue.
A few twists and turns later, red velvet cake has come into its own. You can read more about the history at Southern Living’s article here.
Today, red velvet cake is known to be buttery and slightly tangy with a light cocoa flavor making it stand away from the classic chocolate cake.
Ingredient Tips
To get that velvety texture we are looking for, there are a few key ingredients that we need to use.
- Cake flour. Cake flour has a very low protein content and is ground very fine giving us a light and fine cake crumb.
- Butter and Oil. Using both types of fat is the best of both worlds. We still get that buttery flavor found in red velvet, but we also the have the extra moisture that oil adds.
- Buttermilk. This is our classic Southern tang coming into play!
- Baking Soda and Vinegar. These two go hand in hand! Baking soda needs an acidic reaction to help the cake rise. Vinegar ups that acidity even more to make sure we get a light and fluffy cake.
- Gel Food Coloring. Is it required? No, technically you don’t have to add any food coloring if that not your thing. But if you want the now iconic red color, grab some gel coloring. Gel coloring requires a lot less product to achieve the same results than liquid coloring. Grab the “Red – No Taste” varieties. Gel coloring can be found at places with a decorative baking section like Walmart or Michaels. Or you can buy it online. Wilton is the brand I usually go for!
- Cream Cheese Icing. We have a really classic cream cheese icing. One tip, use the grocery store brand cream cheese for the icing. Brands like Philadelphia brag about how creamy they are, but that means that are also wetter, which is not ideal for icing.
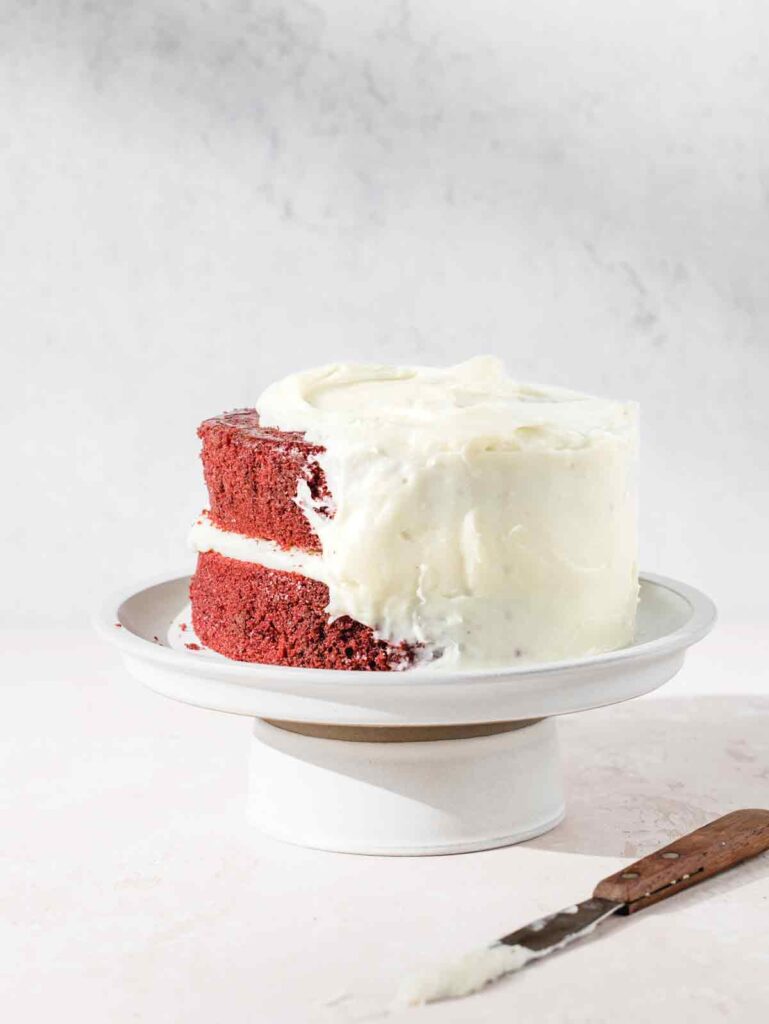
Making a Petite Cake
I love making mini red velvet cakes. Making the cake in a 6″ pan just amplifies the lovliness of a red velvet.
Use we the same cake mixing method as usual here, the velvety texture comes from the ingredients, no fancy techniques!
First, sifting the dry ingredients is always important, but especially so for velvet cakes. This will not only remove any clumps, but really create an airy texture.
In a separate bowl, cream together butter and sugar with mixer until you get a very light and fluffy mixture. Give this the proper time to really whip together. I let this go for at least 5 minutes on a high speed.
Next add the oil and fully incorporate before adding the eggs and vanilla. I like to add the food coloring now instead of at the end. You really need to mix in the coloring, and if you wait until the end, you will end up over mixing the batter and get a tough cake. The tricky part? You need to add more color than you think because you still have a lot of ingredients to add!
Start adding the flour and buttermilk mixture in using the dry-wet-dry method. This means will we alternate between 1/3 of the dry mixture, then 1/2 of the buttermilk, and then repeat. Let the mixture incorporate about 90% of the way before adding the next step. This will prevent the mixture from splitting or over mixing.

Finally, fold in the sour cream by hand just until no streaks remain. Divide the batter between two tins and give one light tap on the counter to remove any large air bubbles. I highly recommend a cake strip for these because they are such a tall layer, this will help create a flat layer.
Cream Cheese Icing
This icing comes together in minutes, but it’s always just so delicious. Whip your ingredients together and you are really ready to go!
But here’s the thing about a good cream cheese icing. It isn’t pretty. It’s just not. It’s soft and silky and doesn’t give you that crisp edge to the cake like a buttercream might. Sure, you can add a lot more sugar to make it firmer, but then you have a final result that is just too sweet. So, while I like a pretty cake, I love a delicious cake, and I deal with the less than pretty icing.
Decorating
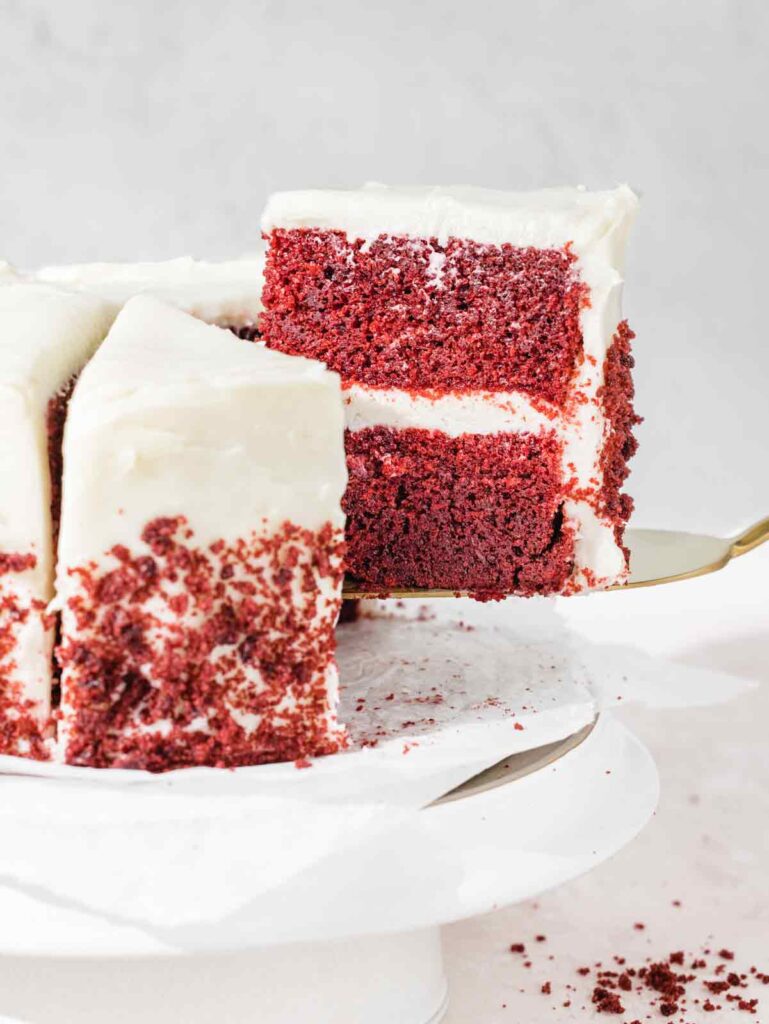
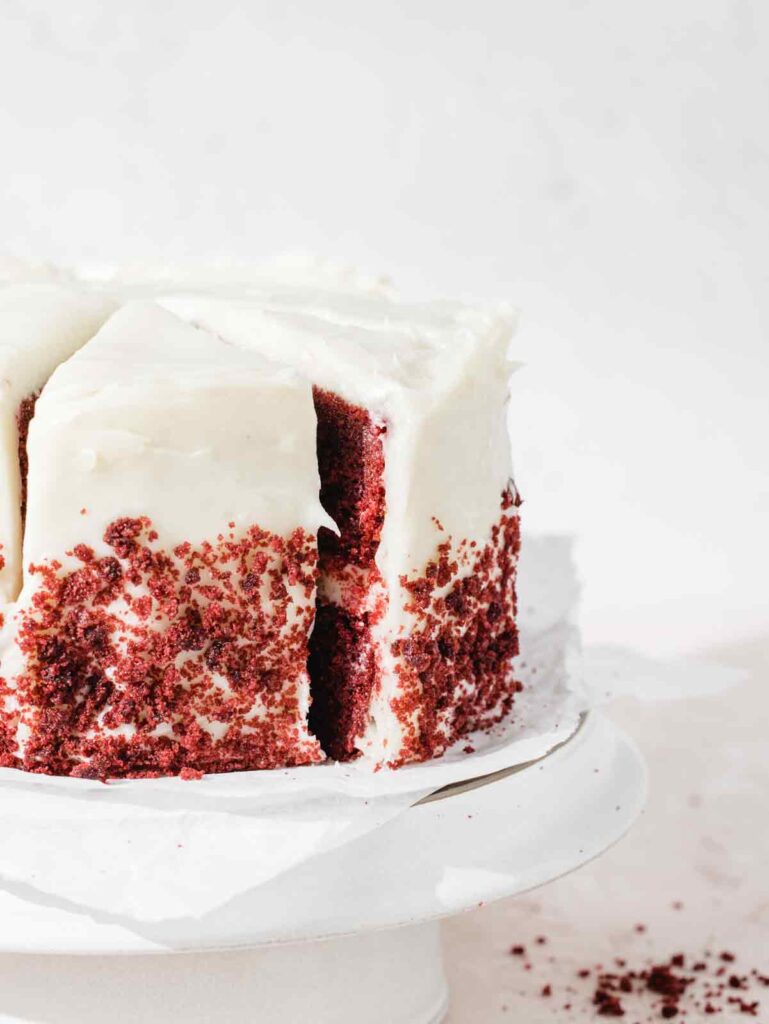
How do I deal with the less than pretty icing? I cover it up! The traditional way to decorate a red velvet cake is by using cake crumbs to coat the outside. This not only covers up the less-than-lovely icing, but it also gives everyone a preview of the stunning cake inside!
Once you cakes are baked and cooled, you can slice the tops off to make a perfectly even layer. A long bread knife is perfect for this. Don’t throw away those trimmings. Or, if you’re like me, resist the urge the eat them. Crumble the pieces up so that you can pat the crumbs on the icing.
If you notice the cake is clumping instead of crumbling, congratulations you have a moist cake! You may need to dry out the crumbs just a bit to get that fine texture. Spread them out on a sheet pan and bake in a low oven for a few minutes. 300°F for about 5 minutes should do the trick. Now you should be able to get a nice crumb for the outside!
Crumb Coat
Because the cake is so red and the icing is so white, I like to do a crumb coat to make sure no crumbs are peaking out where I don’t want them. If you plan to completely cover the outside of the cake with crumbs, you can skip this step!
To create a bit of a barrier, and stop any red crumbs from peaking through, cover the outside of the layered cake with a very thin coat of icing. As thin as possible. Then chill for 30 minutes. This will help the icing to set and hold in all those unwanted crumbs.
Continue to icing as desired after!
Frequently Asked Questions
While I think cake flour is a worthwhile pantry staple, sometimes you’re baking at 1am and are missing a key ingredient! You can substitute a DIY version of cake flour by replacing 1 tablespoon of all-purpose flour with 1 tablespoon of cornstarch per cup of flour (120g of flour).
The buttermilk tang is needed for the overall final flavor. And the acidity is needed for the baking soda to rise. If you only have regular milk, you can make your own quick buttermilk by adding a teaspoon of vinegar or lemon juice to the milk and let it sit for 5-10 minutes before adding to the batter. This will create a reaction that will literally sour the milk.
Cake strips do wonders for helping the cake rise more evenly into a flat layer. Soaking the strips in water before placing them on the outside of the cake tin will insulate the outside and stop it setting too quickly while the middle continues to bake and rise.
If you don’t have cake strips, you can easily make your own. Cut an old kitchen towel into strips as wide as your cake pan height. Wet the towel and secure around the pan using a metal binder clip (do not use plastic!)
These are two very deep layers. I used a 6″ x 2″ pan and it just fits. A 6″ x 3″ pan would give you a bit of breathing room!
Southern Red Velvet Cake
Equipment
- 2 6" cake tins
- 2 Cake strips or cut towel optional
Ingredients
Red Velvet Cake
- 200 g cake flour
- 2 tablespoons unsweetened natural cocoa powder
- ¾ teaspoon baking soda
- 1 teaspoon salt
- 100 g unsalted butter room temperature
- 225 g granulated sugar
- ¼ cup canola or vegetable oil
- 2 large eggs room temperature
- 1 teaspoon vanilla
- Red gel food coloring*
- ¾ cup buttermilk room temperature
- 1 teaspoon vinegar
- 75 g sour cream room temperature
Cream Cheese Icing
- 113 g unsalted butter room temperature
- 454 g cream cheese 2 blocks, room temperature
- 480 g confectioners’ sugar sifted
- 1 teaspoon salt
- 2 teaspoons vanilla
- 1 to 2 tablespoons milk
Instructions
- Red Velvet Cake. Preheat oven to 350°F. Grease, flour and line two 6″ cake tins with parchment paper. Sift together flour, cocoa powder, baking soda, and salt. Set aside.200 g cake flour, 2 tablespoons unsweetened natural cocoa powder, 3/4 teaspoon baking soda, 1 teaspoon salt
- In the bowl of a stand mixer, or with a hand mixer, whip together butter and sugar until light and fluffy. About 5-7 minutes. Add oil. Use a spatula to scrap sides of bowl as you go. Add eggs one at a time. Then add vanilla. Using a clean toothpick, add dollop of red gel coloring to mixture to desired color. Note: you will need a deeper color than your desired result.100 g unsalted butter, 225 g granulated sugar, 1/4 cup canola or vegetable oil, 2 large eggs, 1 teaspoon vanilla, Red gel food coloring*
- Slowly add 1/3 of the dry ingredients, mixing until almost combined. Pour in 1/2 of the buttermilk and vinegar. Repeat with the dry ingredients, buttermilk, and end with the last of the dry ingredients. Stir in sour cream by hand until no streaks remain.3/4 cup buttermilk, 1 teaspoon vinegar, 75 g sour cream
- Divide batter between prepared cake tins. Dampen two cake strips with water and place on the outside of the cake tins. Rap once on the counter to remove air bubbles. Bake for 32-36 minutes until sides are pulling away and cake springs back when touched. A toothpick should come out clean in the center. Remove and let cool to the touch before removing from tins. Place on cooling rack to cool completely.
- Cream Cheese Icing. Whip butter until light, add cream cheese and whip together. Add confectioners’ sugar and whip until no clumps remain. Add salt, vanilla and milk.113 g unsalted butter, 454 g cream cheese, 480 g confectioners’ sugar, 1 teaspoon salt, 2 teaspoons vanilla, 1 to 2 tablespoons milk
- Assembly & Decorating. Once cake is fully cooled, slice the top of the cakes into even layers. Retain trimmings for decorating. Cover one layer with a thick coat of icing. Top with second layer. Place a thin coat of icing on top to create a crumb coat. Place in fridge for 30 minutes to allow icing to set. Remove and cover with remaining icing as desired.
- Crumble cake trimmings into a fine crumb and pat on sides of the cake.**
Notes
- *If you are using liquid food coloring, you will need about 2 tablespoons to achieve this color.
- **See description above for help with cake crumbs
- Uncovered, baked cake layers can be wrapped in plastic and frozen for two months. Place in fridge overnight to defrost before using.
- Store leftover cake covered in fridge for up to two days.
Disclaimer: We test all recipes using the metric weights shown, we cannot guarantee outcomes when switching to US measurements.